
How to Route
NOTE – You will always route two days ahead (with the exception of holidays) – Monday for Wednesday, Tuesday for Thursday, Wednesday for Friday, Thursday for Monday, Friday for Tuesday. No routing on Saturday or Sunday needed.
Route Finalization and Confirmation Process:
- Once logged into Route Planner (RP), start by entering the Planning schedule via the drop-down box in the top right-hand corner of the screen. If the Planning schedule for the location you are routing for is not there, you will need to pull up the schedule using the “Data Filters” tab at the top of Route Planner.
2. Check the Unassigned Stops quadrant for any unassigned stops. If there are unassigned stops, drag these stops into one of your existing truck shells (resources) in the Routes quadrant if there is available capacity. If you are at max capacity, replan the stop in SAP which will move it to a future resource. (Please see Replan Process Guide for additional support).
3. While in the Planning schedule, you will be able to pull ahead additional stops from future routes to maximize your capacity and attempt to complete the delivery on the Target Date. (Please see Pull Ahead Guide for additional support).
4. In the Route Quadrant, select each truck shell for the date that you are routing for. Click on the top clock and then hold down the “Ctrl” key on your keyboard to select the remaining resources. This will effectively highlight each truck. (NOTE – You will not be able to permanently change or manipulate routes while in the Planning schedule due to the Background Optimizer (BGO) that runs while they are still in Planning).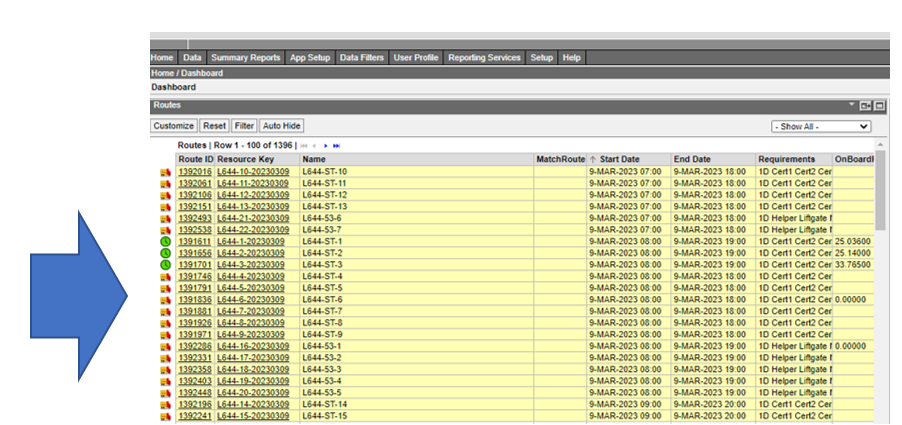
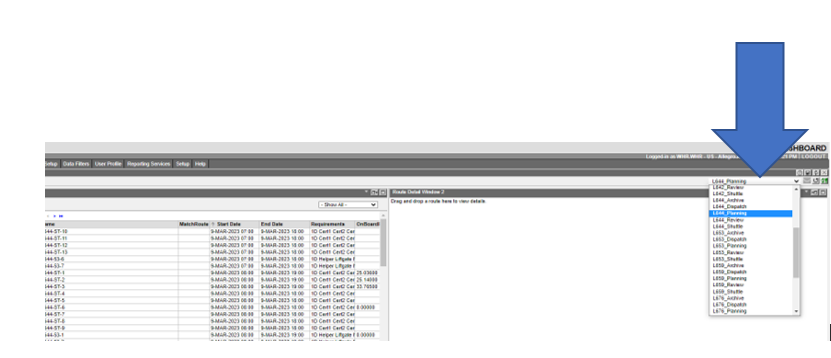
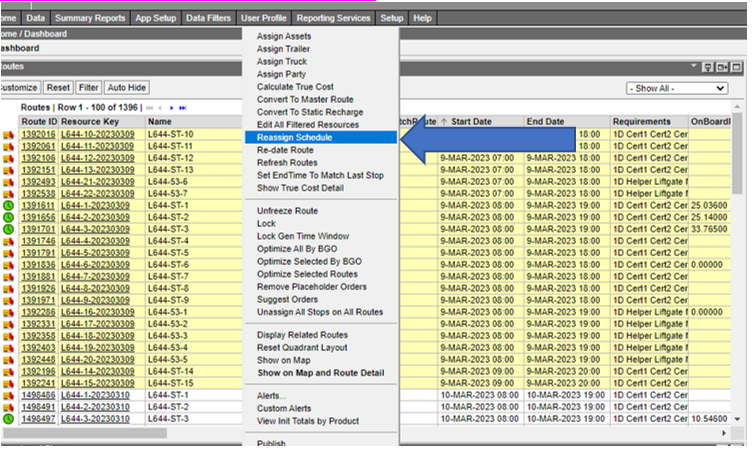
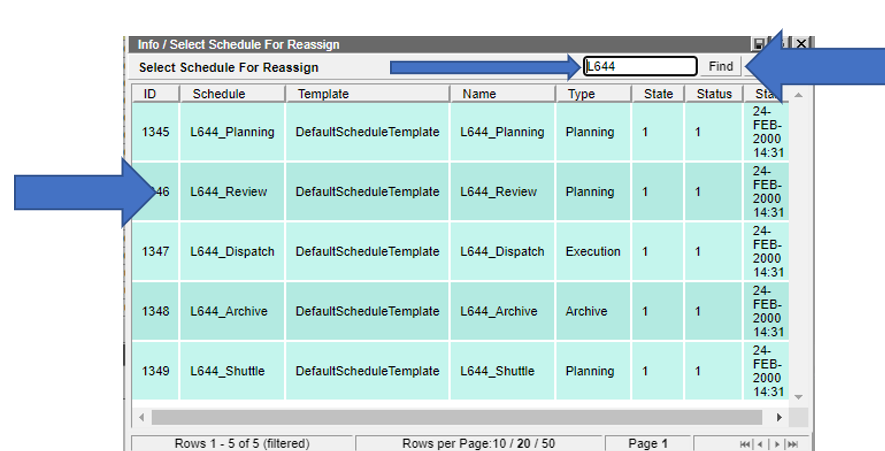
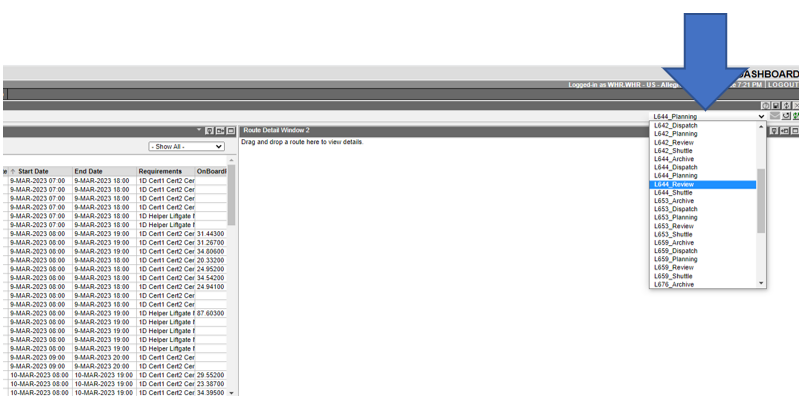
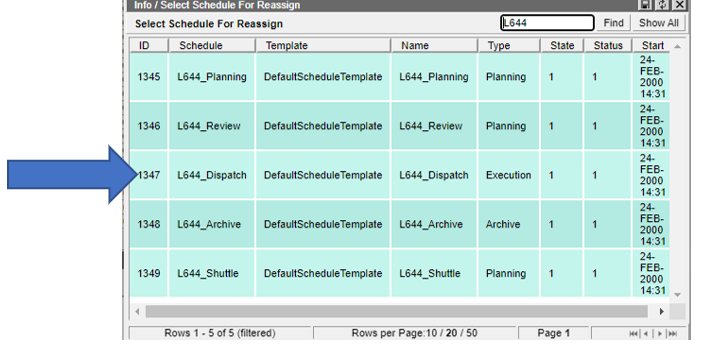
5. Once all resources are highlighted, right click on any of the highlighted rows in the Name column. Then select reassign schedule. A new popup box will appear in which you will need to add your LDC number (LXXX) into the search bar in the top right-hand corner. You will then select find, which will lead you to your LDC’s schedules. (NOTE – It is imperative that you change this to your LDC schedule, or your routes will be sent to another LDC’s schedule where you may not be able to retrieve them.) Once you have your LDC’s schedule (as seen in the picture below), double click on the Review schedule to move these routes to the Review schedule. The resources will disappear from the Planning schedule.
6. Click on the drop-down box in the top right-hand corner to move to the Review schedule. In Review, you can now manipulate routes to create more efficient routes and maximize your capacity per truck by manually adjusting the routes. It is the Routers responsibility to finalize efficient, profitable routes that ensure customer satisfaction.
7. First, you will highlight each resource in the Routes quadrant, right click, and select Optimize Selected Routes. This will run the BGO one last time to allow the system to attempt to make the most optimized routes.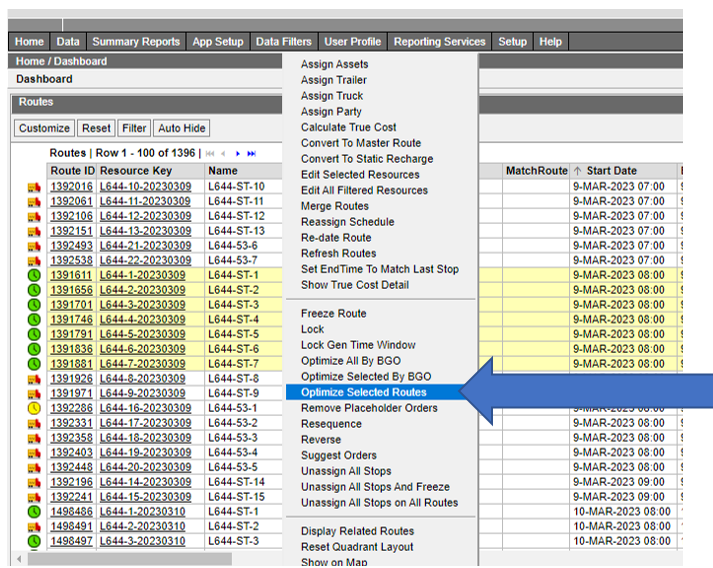
8. If further manual manipulation is required, you must select each necessary resource individually and drag it to the Route Detail Window quadrant. While in the Route Detail Window quadrant, you will then highlight the selected stop from a specific route and then drag that stop to the route of choice or in the preferred stop order.
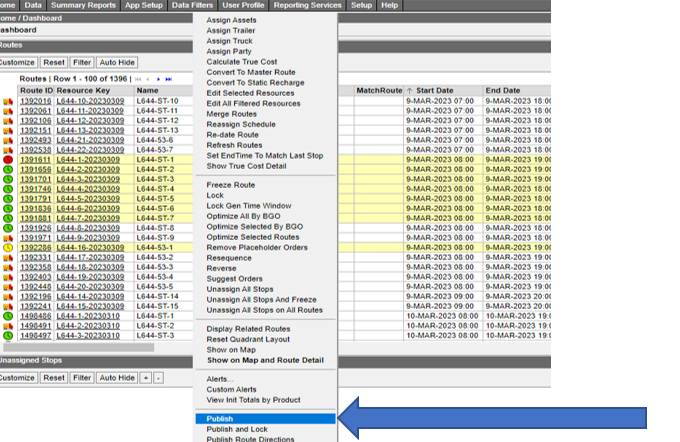
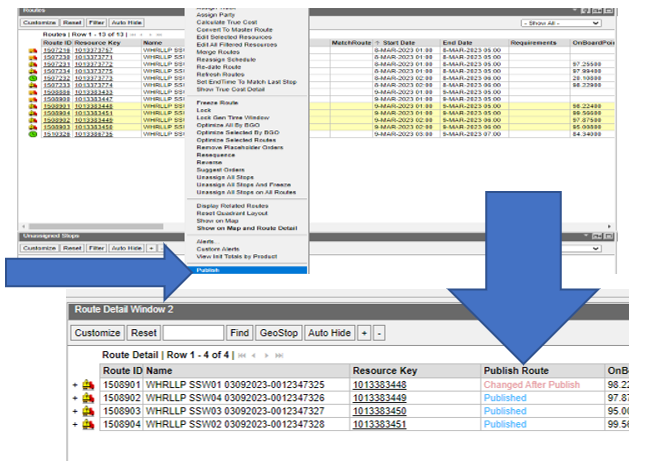
9. Once you have ensured that all routes are optimized for maximum capacity and efficiency, you will need to Publish your routes. To do this, highlight all the resources that have routes associated with them (routes with clocks). Right click on the highlighted resources and select Publish.
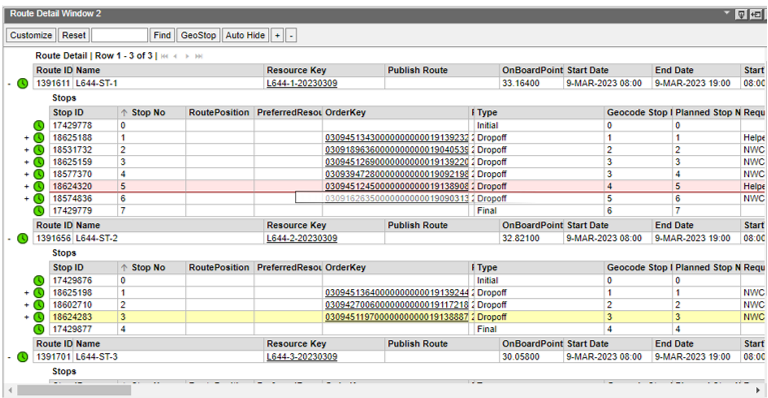
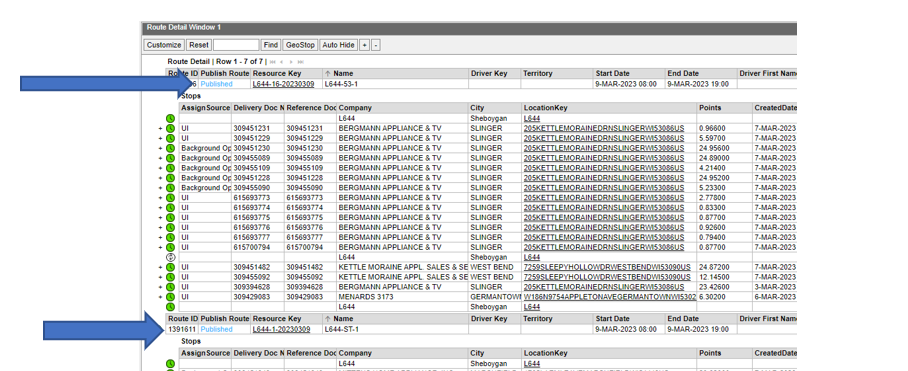
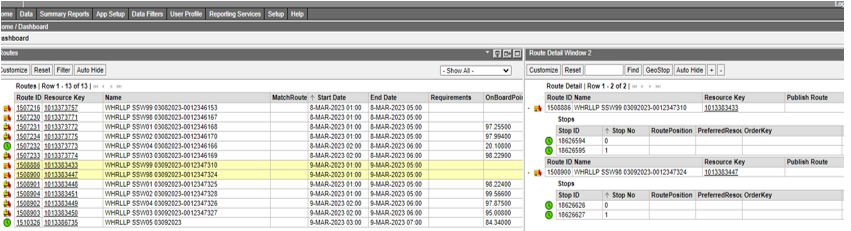
10. Once the routes are published, verify that these are accurately published by checking the route/resource in the Route Detail Window quadrant. If published correctly, the word published will appear in blue (Published) under the “Publish Route” box as seen below:
11. While still in the Review schedule, use the “Routes and Shuttle Template” to take notes on the published routes. This will provide you with additional information that you will need when ordering your shuttles. (Please see Routes and Shuttle Template for additional support).
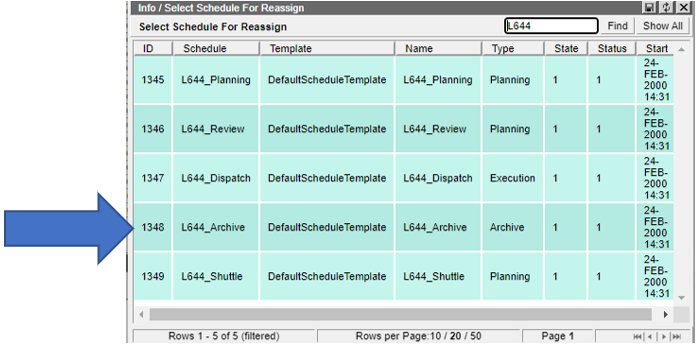
12. In the Review Schedule, highlight each resource with an associated route. Once all clocks are highlighted, right click on any of the highlighted rows in the Name column. Then select reassign schedule. A new popup box will appear in which you will need to add your LDC number (LXXX) into the search bar in the top right-hand corner. You will then select find, which will lead you to your LDC’s schedules. Once you have your LDC’s schedule (as seen in the picture below), double click on the Dispatch schedule to move these routes to the dispatch.
13. Using step 12, reassign all empty truck shell resources that did not receive a route to the Archive schedule as these are no longer needed.
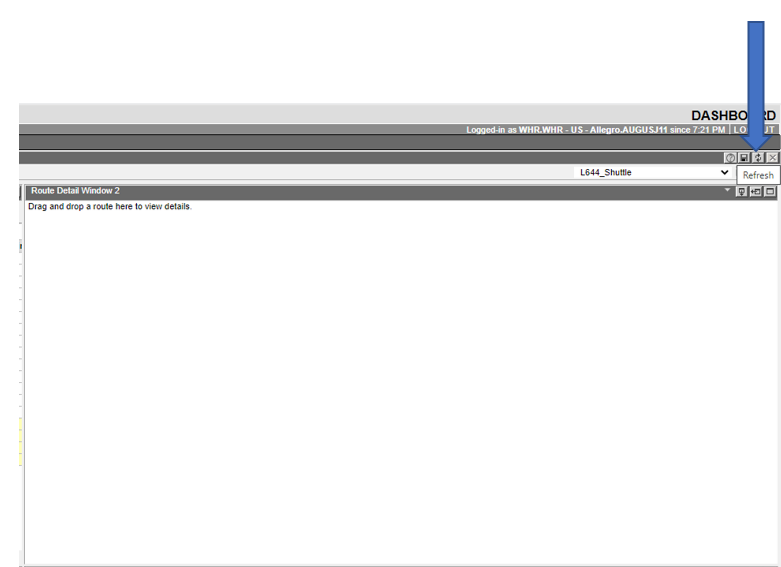
14. Using the drop-down box in the right-hand corner, change to the Shuttle schedule. Click the refresh button in the upper right-hand corner to ensure all BOLs are populated in the Unassigned Stops quadrant. Once all BOLs appear, proceed to step 15. (NOTE – these BOLs may take up to a few minutes to populate in the Unassigned Stops quadrant and all must be present prior to assigning stops to a shuttle.)
15. Select and highlight each needed shuttle shell in the Routes quadrant. The shuttle shell date will be the date you are routing for. (NOTE – Each shuttle should contain between 95-100 points. Refer to the “Routes and Shuttle Template” to determine how many points are contained in each route, which will lead to the number of shuttles you will need to order.) Drag each needed shuttle shell to the Route Detail Window.
16. In the Unassigned Stops quadrant, all BOLs will now be populated. Begin by moving the stops from the Unassigned Stops quadrant to the first shuttle shell in the route quadrant, considering either the staging or swinging method. If staging, highlight and select each stop from one resource at a time, in reverse order. An example for a straight truck resource would be ST-1 stop 4 first, then ST-1 stop 3, then ST-1 stop 2, and then ST-1 stop1. If swinging from the shuttle, highlight and select each stop in order. An example would be ST-1 stop 1 first, then ST-1 stop 2, then ST-1 stop 3, and then ST-1 stop 4. (NOTE – There must be exactly 95-100 points on each shuttle, to keep shuttle integrity and for stops to remain as ordered. To reach 95-100 points for each shuttle, you may need to select a portion of the stops from another resource and then move the remainder of those stops to another shuttle (AKA splitting a truck). An example would be moving ST-2 stop 1 and ST-2 stop 2 to shuttle number one to get the required 95-100 points, and then adding the remaining stops from ST-2 to your next shuttle shell.) Once each shuttle is completed, fill out the shuttle portion of the “Routes and Shuttle Template”.
17. In the Routes quadrant, highlight and select each shuttle shell that was used. Right click on the highlighted shuttles and click Publish. Once the shuttles are published, verify that these are accurately published by checking the shuttles in the Route Detail Window quadrant. If published correctly, the word published will appear in blue (Published) under the “Publish Route” box.
18. After confirming the shuttles were published, enter the Dispatch schedule from the drop-down box in the upper right-hand From the Dispatch Schedule, we will now assign Driver Keys. (NOTE – Assigning Driver Keys allows said driver to log into their MobileLink application on the day of routes and must be completed prior to or the morning of. Assigning Drivers on the morning of, or adjusting driver assignments may require publishing the routes to WGLN). Start by highlighting the first resource, right clicking on the highlighted resource, and selecting Assign Driver/Crew. On the next screen, select Filter.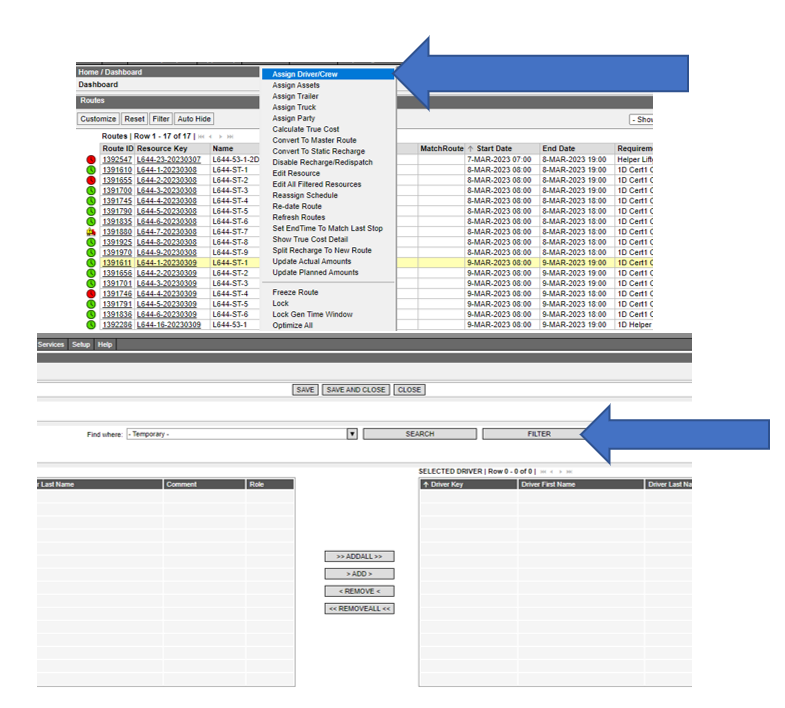
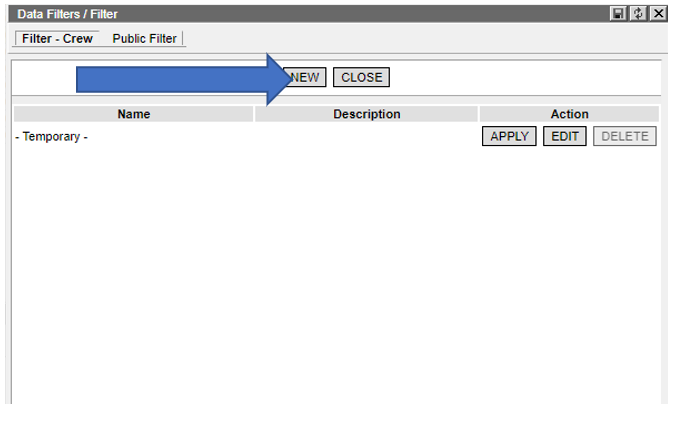
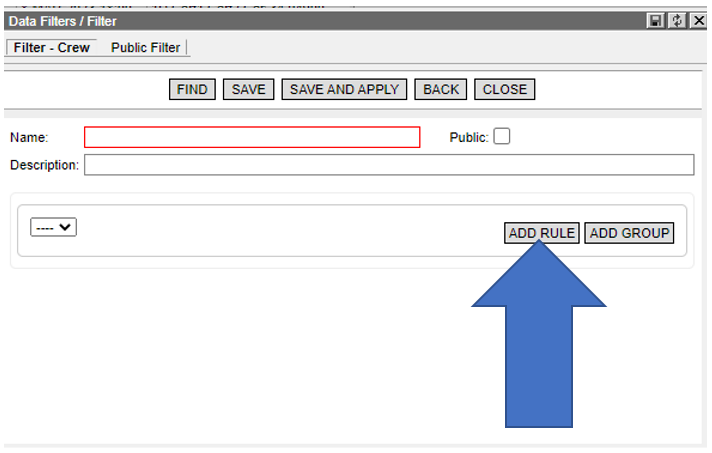
19. A Data Filters box will appear, where you will select New.
20. Select Add Rule.
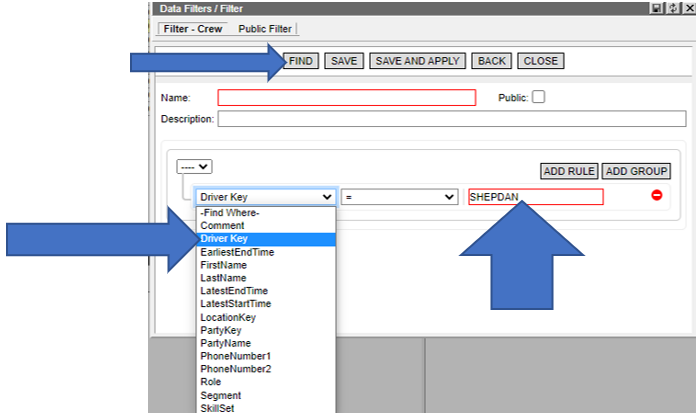
21. In the drop-down box on the lower right, select Driver Key and then enter the Driver Key of your preferred driver/crew. Then select Find
22. From the Drivers and Crew screen, select your chosen driver and select Add. Once the driver’s name appears on the right side, select Save and Close.

23. Repeat steps 18-22 to assign Driver Keys to the remaining resources.
24. If on the morning of the routes a route needs to be adjusted, you must right click on all resources that had adjustments made and select Publish to WGLN. This is what updates MobileLink to match the changes you made.
25. This concludes the routing process.
No Comments